Tuesday, May 30, 2017

Wedding Bells and SpringTime Flowers


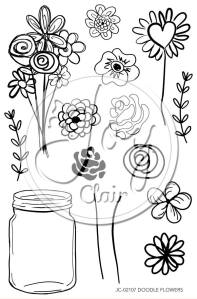
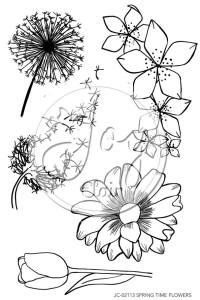
Greetings friends, LeeAnn here today with a project that is very near and dear to me. I used the Spring Time Flowers and Doodle Flowers sets on this fun project. 


Now a little backstory. I have three wonderful daughters, 2 awesome sons in law, and 2 amazing grandchildren. My two oldest daughters are married and the baby is getting married in August. Due to the fact that my older two lived many miles away when they married, I really did not get to participate as much as I would have liked. Leave the last, who only lives an hour away... I get to do all the fun stuff now. So far we have been to a bridal show with her future mother in law, went dress shopping along with my middle daughter, my grandbaby and one of my daughter's friends (and she said YES to her DRESS). Well, the best part of all was the privilege of making her invitations and rsvp cards. Which brings me back to my post. 

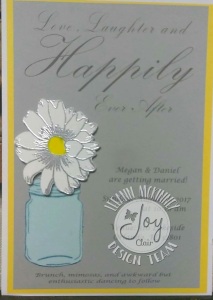
As my daughter and I were figuring out what she wanted her for the invitation, I was sending her photos of our new stamp sets. she said she wanted Daisies, so I said hang on, I quickly stamped the daisy and sent it over FB messenger. I said I have another idea... I stamped it, cut with the Scan n cut, stamped again and heat embossed it and added some yellow in the middle... eh, but not sold yet. I told her to give me a few minutes... I stamped, close cut so no framing, stamped again, heat embossed, added some Fabrika Cornflower drops in the middle, also stamped the Jar from the Doodle Flowers set on light blue cardstock, and then added cut vellum over the top to look like glass. SHE LOVED IT!!! Then the fun part of her wording started. 
   

What you see here is the final cut of my daughter's wedding invitation, of course, information has been blurred out. 


 I hope you have enjoyed this project and it has given you some inspiration.

Please follow Joy Clair's facebook pageColor by Faith Bible Journaling facebook pageInstagram and Twitter, be the first to hear the news, sales and giveaways! They also have a Pinterest page and Youtube channel for your inspiration!
Thank you for stopping by and please come back again soon!
Monday, May 29, 2017

Quick Quotes, Calm The Storm

Greetings friends and fellow crafters. I'm here today with a card that I made using paper and inks from Quick Quotes and a stamp set from Joy Clair.

I stamped the ship image with Mocha Mama and set aside to dry. I then went to work with the base panels. The main panel cut from Chiffon is 4.5 x 5.75. I then made a smaller layer of 4.25 x 5.5 from Adventure Awaits. A panel of white that had been run through an embossing folder and cut to 3.75 x 5 was attached next. A layer from Adventure Awaits was cut with a 4.5 diameter circle die, followed by another piece fo the Chiffon cut at 1.25 x 3.75 with banner tails, I then cut Adventure Awaits again at 1 x 3.5 to make a smaller banner tail.
I used a rope stitched oval die to cut the panel for the ship.
Now that the ship is dry, I used Royal Blue for the water, and Sky Blue for the sky, both on the image panel and the embossed sheet underneath so that it all flows together.


Quick Quotes Products Used:
Adventure Awaits
Chiffon 101
Royal Blue Powderpuff Ink
Sky Blue Powderpuff Ink
Mocha Mama Powderpuff Ink

Other Product Used
Joy Clair Stamps: All Things Possible

Thank you for checking out my project today. Please come back tomorrow to see what our next designer has for you.

Thursday, May 25, 2017

Fathers Day revisited Joy Clair


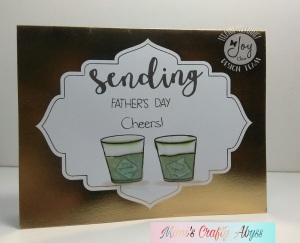
This card was created using two stamp sets Hello Sentiments and Raise Your Glass. And the process was as follows:


  • Using a foiled card base, I used the 'sending, Father's Day' from the Hello Sentiments set, and the 'cups and Cheers!' is from the Raise Your Glass set. I stamped these images using Memento Tuxedo Black. 
  • I colored the inside using a dab of Encore Metallic Gold pigment ink. 
  • Once the ink was cured I used irRESISTible Pico Embellisher to give it a glassy look. 
  • I set this aside and let dry, and with that this project was complete. 
I hope you have enjoyed this project and it has given you inspiration to use this set to make cards for yourself. 


Please follow Joy Clair's facebook pageColor by Faith Bible Journaling facebook pageInstagram and Twitter, be the first to hear the news, sales and giveaways! They also have a Pinterest page and Youtube channel for your inspiration!
Thank you for stopping by and please come back again soon!

Wednesday, May 24, 2017

Joy Clair Fathers Day Inspiration

Greetings crafty friends. LeeAnn here today with a little Father's Day Inspiration using the Father's Day set from Joy Clair.


The process used is as follows:
  • The card base is 4.25" x 5.5", the black later is 4" x 5.25" and the top layer is 3.75" x 5".
  • Using Warm Sand color Powderpuff Chalking ink I created the sand trap. I then covered it with post-it tape. 
  • I then used Jade and Seafoam Powderpuff Chalking inks to create the green.
  • Once this was dry (doesn't take these inks long) I used Versafine Onyx Black to stamp the imaged sentiment in the upper right corner. 
  • Once I was sure the sentiment was dry, I used double sided tear tape to adhere all the panels together and my project was complete. 
I hope you have enjoyed this project and it has given you inspiration to use this set to make cards for yourself. 


Please follow Joy Clair's facebook pageColor by Faith Bible Journaling facebook pageInstagram and Twitter, be the first to hear the news, sales and giveaways! They also have a Pinterest page and Youtube channel for your inspiration!
Thank you for stopping by and please come back again soon!

Sunsational Stamps Swim Time Fun

Greetings crafty friends. LeeAnn here today with my latest inspiration project. This one is using the Swim/Beach/Ocean theme.
For this project I used 2 of our great stamps:
Cool Cari:
Cool Caleb:

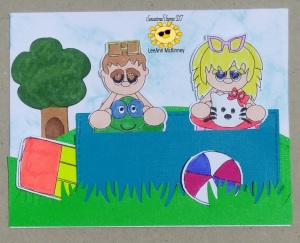
The first thing I did was use tumbled glass distress ink to formulate the summer sky look. After printing the images, I cut away the raft from Caleb and the ball from Cari. using some rectangular stitched dies and lawn fawn grass and hillside stamps I cut the landscaping and pool. I placed Caleb and Cari in the pool and the raft and ball outside in an arrangement that made me happy. 

All images colored with Spectrum Noir Alcohol Markers:
Tree: DG3, LG2, GB7, TN3, EB5
Pool Float: FL2, FL3
Beach Ball: DR6, TB5
Body: FS2, FS3
Caleb's Hair, Eyes: TN3, TN4
Caleb's Float: LG5, DG1, TB4
Caleb's Goggles: DG1
Cari's Hair: LY2, CT2
Cari's Eyes: TB4
Cari's Float: FL1, PL1, IG1
Cari's Goggles: PL1
Background Sky: Tumbled Glass Distress Ink

Thank you for stopping by, hope you have clicked the follow link and come back to see my next post.

Tuesday, May 23, 2017

Addicted to Stamps Challenge #243- Holiday

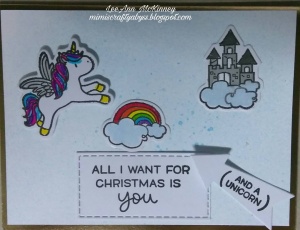
Greetings friends and fellow crafters. Today I am here with Addicted To Stamps and More Challenge #243 Holiday Theme. I chose a Christmas card for my project and looked through my stamps to see which set I wanted to use. I chose a Mama Elephant set called Over the Rainbow. This set came with four dies and eight stamps, and let me say they stamp and cut quite easily.


Using Archival Black I stamped out my images and then My sentiment (Lawn Fawn Winter Unicorn Set) was stamped using Versafine Onyx Black Once my images were dry I used Zig Clean Color Real Brush Markers to color the Unicorn and Rainbow. The Castle was colored with Wink of Stella Silver and Black. The clouds and background were completed using Fireworks! Summer Sky. My background is made using Tim Holtz Watercolor paper.

I hope this has given you the inspiration needed to join us in this weeks challenge. I really look forward to seeing all the entries.

Sunday, May 21, 2017

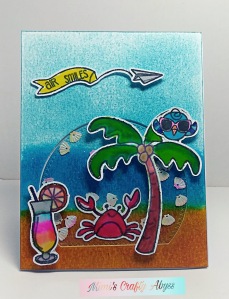
Air Smiles


Greetings friends and fellow crafters. I'm here today with an entry I made for the May challenge over at A Blog Named Hero's blog. The sponsor this month is Honey Bee Stamps. Link up #30

So, going through my Hero Arts stamps I decided that this set from 2013 would be great since summer is almost here, and I am ready.

Special Delivery


Image result for hero arts let's chill clear stamps

So, after going through my stash and finding the sets I wanted to use, I made my plan.  Using watercolor paper and my distress inks I went to work. The beachy area is completed using Wild Honey and Dried Marigold. The water area is Mermaid Lagoon, and the sky is a combination of Broken China and Tumbled Glass. 
Once it was dry I used a cross stitched globe die to cut out the section for my shaker. 
I stamped the Palm  Tree, Crab, Bird, Plane, and banner with Gina K Black Onyx Permanent Dye Ink and used my Scan n Cut to cut out the images. 
Using my Zig CCRB Markers I colored the images.
The Crab is in the shaker section with all the little shimmery shells. I used double stick tape and tear tape to adhere all my elements together. 
I hope you have enjoyed my project, the list of supplies used is here:

Hero Arts Let's Chill stamp set
Honey Bee Special Delivery stamp set
Hero Arts Distress Inks
Zig Clean Color Real Brush Markers
Tim Holtz Watercolor Paper
Gina K Permanent Black Onyx
Kat Scrappiness mini Pearlescent Seashell Sequins
Lifestyle Letterpress Crafting Media Sheets
Globe dies

Thursday, May 18, 2017

Quick Quotes- On Lake Time

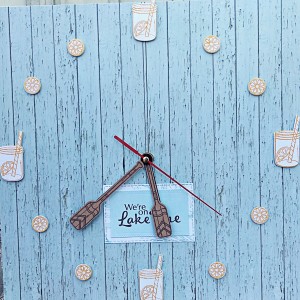
Greetings friends and fellow crafters. I'm here with Quick Quotes today with a special project. Let me tell you the stamp sets from Dare2BArtzy were the inspiration for this project, and this paper and ink from Quick Quotes was absolutely perfect to bring it together. 

Items Used were a paper from Anchor's Away and Adventure Awaits, Clock set from Amazon, 2 Dare2BArtzy stamp sets, Brother Scan N Cut and 2 Powderpuff inks. 

Using my stamp positioner I stamped out the images I wanted to use including the sentiment. The sentiment and the paddles were stamped using Mocha Mama Powderpuff Ink.

The lemon slices and lemonade jars were stamped using Buttercup Powderpuff Ink. I then placed foam squares on the back of each image and used double stick tape for the sentiment panel which was cut from Anchors Aweigh AW100. The background is made using Adventure Awaits AD103. 


 My finished product. I am so happy with my clock. My husband loves it and wants to put in the living room, but in my craft room, it will stay for now. 

Supply List from Quick Quotes:

I hope you have enjoyed this project. I'll be back later in the month with another stamping project. Be sure to come back tomorrow and see what our next great designer has in store for you. 


Wednesday, May 17, 2017

Spring Flowers #rrcb62

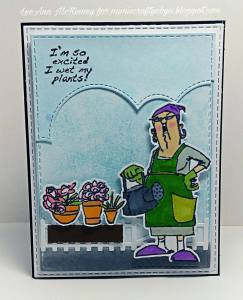
Greetings friends and fellow crafters, LeeAnn here with a project I made for the Retro Rubber challenge blog with the theme of Spring Flowers. If you are not familiar with Retro Rubber, the stamps used must be at least one year old or older. The stamp set I am using for this project is Art Impressions-Hampton Arts SC0650 dated 10-06-2014.


Making this project I stamped the lady (daughter said she looks like A Scary Movie Grandma) and the plants, then used my Scan n Cut to cut them out.

Once that was done my Spectrum Noirs went to work:
Slippers and Scarf- HB3
Dress- GG1
Apron/Pocket- CG4/CG2
Gloves- LG3
Water Can- IG3/IG5
Skin- FS2/FS2/PP2
Flower Pots- OR1/GB3
Flowers- CR1/PP2/HB2
Background concrete- Hickory Smoke Distress Ink
Sky-Tumbled Glass Distress Ink
Top Sky Layer- Summer Sky Fireworks spray
Cloud Die from Die Cuts & More
Flower Box rectangle- Kat Scrappiness
Fence- Unbranded die from Ebay

I hope you enjoyed my post, please come back soon to see my next project.

Saturday, May 13, 2017

Joy Clair Hello Sentiments-Lets Celebrate

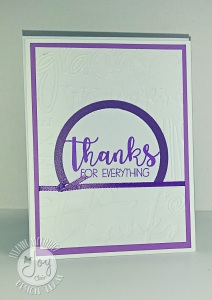
Greetings crafty friends. LeeAnn here with two projects I made using the new Hello Sentiments and Let's Celebrate stamp sets.
 

I am using our technique of the month of Layers for these projects, and really had a bit of fun.

For this first project, my recipe to make is:


  • 4.25" x 5.5" white card base
  • 4" x 5.25" purple layer
  • 3.75" x 5" embossed layer using Cuttlebug "thanks" embossing folder.
  • 4.5" ribbon strip tacked on each side and knotted to one side
  • 3" purple circle layer
  • 2.5" white circle layer, position the stamps on this layer for best fit, and stamp using Memento Grape Jelly ink. 
  • use double stick tear tape to adhere the circle layers together and trim off the bottom 1" 
  • adhere all layers together using double stick tear tape. 
  • at this point this project is complete
For my second project many of the steps were the same:


  • 4.25" x 5.5" card base in black
  • 4" x 5" white layer embossed with 2" run through "Tiny Dots" embossing folder, and pattern paper layer 3" x 3.75"
  • red ribbon 4.75" long knotted on one side
  • 3" black circle layer
  • 2.5" white circle layer, stamp 2 balloons in the background using Memento Gray Flannel, and 1 heart balloon to layer, Color using Memento London Fog and Lady Bug markers, leaving accent lighting. Color the balloon ribbons using the same colors. Happy Birthday sentiment is also stamped using Gray Flannel.
  • Adhere panels together using tear tape, attach heart balloon using foam dots, and the balloon ribbons using On Point Glue. 
I hope you have enjoyed my projects today, I really had a great time making them and see more of this style in my future. 


Wednesday, May 10, 2017

Sunsational Fathers Day

Greetings friends and fellow crafters. LeeAnn here with a Fathers Day card to give you a little inspiration for that card you may need to make.

Great Sport Set:

After printing the Great Sport Stamp Set, I used my Spectrum Noir Markers to color the football.
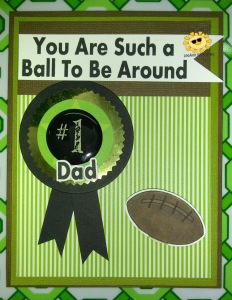
I used a 2.5" circle die to cut a black circle and a 1.5" circle to cut the green. A gold seal sticker was used in between and a #1 epoxy sticker was put in the middle. The main base is 4.25"x5.5" brown, second layer is 4"x5.25" olive, 3.75" x 5" in green/white stripe with a 3.75" x 1.5" brown layer on top. I cut the sentiment .75" wide with a banner tail at the end. I cut 2 banner tail strips .5" wide and adhered them to the underside of the medal. The football was attached using foam tape to give it added dimension, and with this my project was complete.

I hope you have enjoyed my project. Please come back soon for my next post.

Tuesday, May 9, 2017

Addicted To Stamps and Spreading Happiness Challenge #241

Challenge Link


Greetings friends and fellow crafters. This is my first post on the Addicted To Stamps team and I am so excited to share my first post with you.

Addicted To Stamps is comprised of Clean and Simple (CAS) Challenges. There is a new challenge every Wednesday, and each will run for 2 weeks.

SO... this is my project for this first post.


In making this project, I used a Mama Elephant stamp set called Up We Go. I stamped out the little bunny, and the balloons I then used the included dies to cut them out.

The background pattern paper is from a Simple Stories 4x6 paper pad called "Snappy Sayings". I cut and A2 card base to 4"x5.5". I then trimmed a piece of white cardstock to 3.75" x 5.25". Using "Tumbled Glass" distress ink, I smooshed out the background sky. I followed that up by using my stamp positioner to stamp out the balloons and sentiment directly on the background page using Versafine Black Onyx ink.

I went back to my balloons and bunny and with my Spectrum Noir Markers went to work. The bunny was colored using TN3 and GB1. The balloons were colored using CT1, LG2, OR2, JG2, IB2, FS6, GT3, LV2, GB5, PL1, DR3, and TB6.

Once my images were complete, I cut a small V in the bottom of the balloon strings, and then when adhering the bunny with Kaisercraft double stick tape I and the strings on the bunny's hand.
I attached 3 pop dots to the back of the balloons and positioned them over the stamped balloon image so that it lined up as best possible with the strings. I adhered this white layer with double stick tape and my project was complete.

I hope this has given you inspiration, and I look forward to seeing your projects for this challenge. Please click HERE to join the challenge and see the rest of the teams projects.


Monday, May 8, 2017

Quick Quotes Mothers Day 2017

Greetings friends and fellow crafters. Bear with me please as this is always a hard time of year for me. Not only is it Mothers Day this coming Sunday (14th) but the 12th would have also been my mom's 72nd birthday.

When coming up with a project for this post, I decided to use a photo from my last visit to the cemetery, and if I am able to visit again this weekend it will go with me, along with a card I made last month.

For this project, I used papers and a quote from the Mulberry collection, and I was also able to use my wonderful Canon Selphy printer. I really am getting a lot of use out of this little machine. I printed my photo on a 2.5" x 3.5" sticker stock.

First I did was decide the paper pack I wanted, and since my mom loved the color blue most of all, I decided on the Mulberry pack. I also fondly remember a pair pants she wore quite a bit when I was young that were stripped, so it only seemed right to use the stripped paper as my background. I then pulled a blue page and a gold page to work as my matting for the photo and quote.

The quote I used states "I love thee with the breath... smiles... and tears of all my life!". This is so true, and often times I think about what she would think of how things are changing and it makes me smile, laugh and at times cry thinking about her missing the joy I am feeling.

I hope you have enjoyed this project. Please make sure to come back tomorrow to see the next project our design team has in store for you.

QQ Products Used:
Mulberry QQP-MB100, 103 and 105
Mulberry Quotes & Phrases QQP-MB600
Canon Selphy CP1200

Friday, May 5, 2017

Sunsational Stamps Fathers Day Inspiration

Greetings friends and fellow crafters, LeeAnn here bringing you a Fathers Day Inspiration for my first post in May. Hard to believe it is already May. So using the Sunsational Stamps Reclining Dad digital image set.

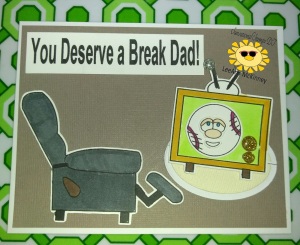
I printed out the images and used my Scan n Cut to cut them out. I used my Spectrum Noir markers to color the images and then arrange them in a way I was happy with.

Front of card:

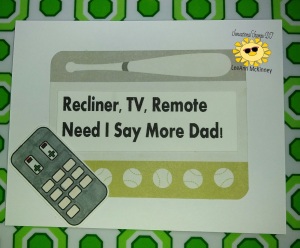
Inside of card:

For the inside, the image with the baseball at and balls is from a WRMK 3" x 4" stack called MVP.

Spectrum Noir Markers Used:
Chair: GG4, BGR1
TV: GB7, TN3, LG2
Baseball: FS2, DR6
Remote: GG3, DG1, FL1, CR2

I hope you have enjoyed my project.