Greetings friends and fellow crafters. LeeAnn here today doing a collaboration with Joy Clair and My Sweet Petunia's Stamping Tool the MISTI (Most Incredible Stamping Tool Invented). The MISTI has been a game changer for many stampers since its introduction to the market in 2015. Today I am going to be using the Mini MISTI for my project.
The MISTI came nicely packaged in a cardboard shipping box with packing paper to protect it.
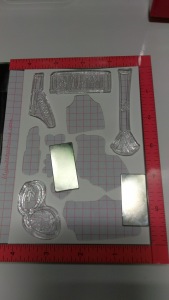
After taking the MISTI out of its packing box and then brand box, it was yet again wrapped in cardboard and then plastic. You can see the two rare-earth magnets that were on the bottom.
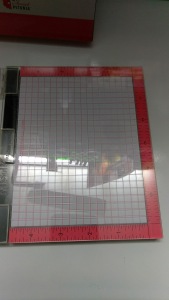
The mini MISTI outside dimensions are 6 x 7 while the inside workspace dimensions are 4.75 x 5, I primarly make A2 size cards so this size works for me in most cases. There are 2 others sizes that are larger, the Original (8 x 10 work area 6.5 x 8.5) and the Memory ( 13.75 x 14 with 12.25 x 12.25 workspace). Each MISTI comes with 2 magnets, Foam Pad to use when using Clear Stamps (not needed with thicker cling stamps) and a sample of grid paper (about 10 sheets).
Each MISTI has the grid under neath the bottom of the tool, which can not be seen through the foam. Also on that bottom layer is a Bible Verse (As each has received a gift, use it to serve one another as good stewards of God's varied grace. 1 Peter 4:10)
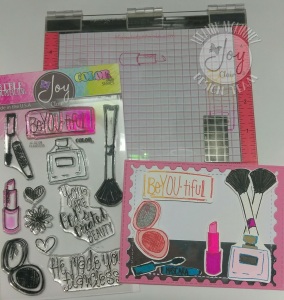
So, on with my project. used the Joy Clair SVG file to cut out the pieces for the stamp set I chose to use. I then cut the negative to the size to fit in the MISTI.
I then placed each stamp within the space that it belongs.
I opened the MISTI and inked up the images. I had also used this time to put the die cuts in their proper spaces.I then closed it down and applied slight pressure to transfer the ink to the cut. I then opened the lid, inspected my cuts, re-inked and because my pages did not move, I was able to re-stamp in the same place again.
After inking all the pieces I wanted to use for this project, I used my Spectrum Noir Markers and colored it up. My project was then put together using red power-tape and my project was complete.
Spectrum Noir BT7, BT8,TB2 CR1, CR2, BP1, BP4, BP6
I hope you have enjoyed my project today. Please hop along and see all the great projects made by both teams.
Joy Clair is giving two prizes: each a $25 dollars gift card from Joy Clair Store. To participate all the readers need to leave a comment on each designer blog, including the company blogs. Winner will be announced in our Joy Clair blog at the end of the month.
You should have come to me from Jeanne's blog, and Maureen's is next. If you started here head back up to the top and start with Ilina to make sure an get everyone. This is a longer hop that usual as we have both teams working together, please make sure to comment on each post.
Jeanne Streiff Previous
LeeAnn McKinney YOU ARE HERE!!!
Maureen Wong Next
Please follow Joy Clair's facebook page, Color by Faith Bible Journaling facebook page, Instagram and Twitter, be the first to hear the news, sales and giveaways! They also have a Pinterest page and Youtube channel for your inspiration!


Love it LeeAnn.
ReplyDeleteSuch fun ...
ReplyDeleteYour card is a lot of fun! MISTIs have been such a game changer for stampers.
ReplyDeleteSWEET!!!! WHAT woman doesn't like make-up??? LOL SUPER TUTORIAL on using the SVG cuts! ;)
ReplyDeleteOh that is a fun card! LOVE that!
ReplyDeleteLove your fun make-up card! Love your tutorial too!
ReplyDeleteLove your fun make-up card! Love your tutorial too!
ReplyDeleteSO fun! And well, well, well, thanks for pointing out the bible verse printed on the Misti...I didn't notice that before! How awesome! :)
ReplyDeleteI am excited to be learning about the Misti. When I see one I shall look for the Bible verse. I think this make-up card is so fun.
ReplyDeleteThanks for the great tutorial LeeAnn, your card is awesome!
ReplyDeleteVery fun card and a great introduction on tips for using the MISTI!
ReplyDeleteEnjoyed your project
ReplyDeleteSuch a fun scene!
ReplyDeleteCute card. I definitely need a Misti and Creative Corners.
ReplyDeleteSo very cute!
ReplyDeleteFun!!!
ReplyDelete101 ways to use a Misti!!! Fun card and great tutorial!
ReplyDeleteCute, Girly card.
ReplyDeleteLove this fun feminine card:)
ReplyDeleteI agree with you about the Misti. I never was any good at stamping before the Misti. I never could get it right the first time and could not match it up to stamp over it. Nice card.
ReplyDeleteCute cute card! Great for Teenage Girl.... TFS
ReplyDeleteCute cards!! Thanks for sharing!
ReplyDeleteFun card and great tutorial.
ReplyDeleteI love your ideas! Thanks for sharing some great inspiration today!
ReplyDeleteLove the idea of a mini Misti.
ReplyDeleteThis is great LeeAnn!! TFS
ReplyDeleteI love it. I want the mini misti.
ReplyDeleteWhat a fun card. Thanks for sharing and participating in the blog.
ReplyDeletevery pretty ,nice stamp set, dont see many of those kind!!
ReplyDeleteI love getting new ideas and supply ideas! Thanks!
ReplyDeleteGirls young and old would enjoy this card!!
ReplyDeleteVery cute card!
ReplyDeletethanks for sharing your creativity, what a great stamp set for a teenage girl.
ReplyDeleteWhat a fun card.
ReplyDeleteYour card has so many possibilities.
ReplyDeleteFun stamps! I'll have to go check my Misti for a Bible verse.
ReplyDeleteFun card.thanks for the directions withthe Misti.
ReplyDeleteAdorable card! Thanks for all the information.
ReplyDeletePerfect card design for the ladies who wear make-up...I think teen gals would like this as well.
ReplyDeleteThanks for sharing!
ReplyDeleteVery cool idea on how how to use those remaining scraps. Cute card. TFS
ReplyDeleteWhat a fun set for a Girly Girl ;-)Thanks for sharing.XO April
ReplyDeleteI would love to have a misty. Cute card
ReplyDeleteSuper fun card and thanks for sharing about the Misti.
ReplyDeleteThanks for those wonderful instructions. Your card is so pretty.
ReplyDeleteYour card is BeYou-tiful!
ReplyDeleteFun card.
ReplyDeleteLove the misti. Such great quality!
ReplyDeleteWhat a fun, cute card. Thanks for the Misti information.
ReplyDeleteLove how the Misti saves time!
ReplyDeleteCool card, love my Misti!
ReplyDeleteSuch adorable card! So cute!!!
ReplyDeleteGreat card! Thanks for all the info!
ReplyDeleteClever technique!
ReplyDeleteI love my Misti & Love your card too! Love how easy it is to stamp multiple images at once!
ReplyDeleteI so hope one day to own a Misti!!
ReplyDeleteSo cute ...nice work!
ReplyDeleteThe MISTI is amazing! Great job showing it off!
ReplyDeleteHow did we stamp before the creation of the MISTI? It's such an awesome tool!
ReplyDeleteLeeAnn, love how you unveiled the Misti. Love your card. Thanks for the inspiration.
ReplyDeleteGreat way to show how to get the most from the MISTI! Thanks for showing us all the steps!Blessings,Melitta
ReplyDeleteI adore the MISTI!
ReplyDeleteIsn't the MISTI the best?!?
ReplyDeleteWhat a fun card!
ReplyDelete